Wednesday, January 19, 2011

A little lemony love - Cookie #94

While I was recently browsing the internet for cookie inspiration, I came across this fantastic idea of imprinting a sugar cookie with a cookie cutter before baking.  The resulting cookie would have the imprint of the shape of the cutter and give you a nice, neat little template to ice/decorate. 

Unfortunately, I don't remember where I saw this idea

Normally, I'm pretty good about saving ideas to my favorites, but for some reason I didn't.  Boo.
As one who shares some original ideas via a blog, I understand how important it is to give credit where credit is due.  I spent quite a length of time searching pages upon pages of images on Google, with no luck. 
So, to that fellow blogger, I want to give you credit for the idea - really I do - I just can't remember who you are.  If anyone has seen this idea on another blog, please shoot me an email or commentI'll gladly add the link to the post, ASAP.  :)

Now, onto the idea.  If I remember correctly, the original recipe used a plain sugar cookie.  I decided to jazz things up a bit.  I had some Betty Crocker Sugar Cookie Mix in my pantry that needed to be used.  I also had a lemon in my fridge that was just about beyond it's time - that had to go, too.
Perfect pairing. 
My original idea was to roll the cookie into a log, freeze, then slice into 1/4" rounds before baking.  Instead, I dropped rounded tablespoons full on the cookie sheet and smooshed them with the bottom of a glass dipped in sugar.  The sugar added some much needed sweetness to the cookie.  I think without it, it would've been a bit too tart.  Both my Trusty Taste Testers loved them as well as my Junior Taste Testers. 
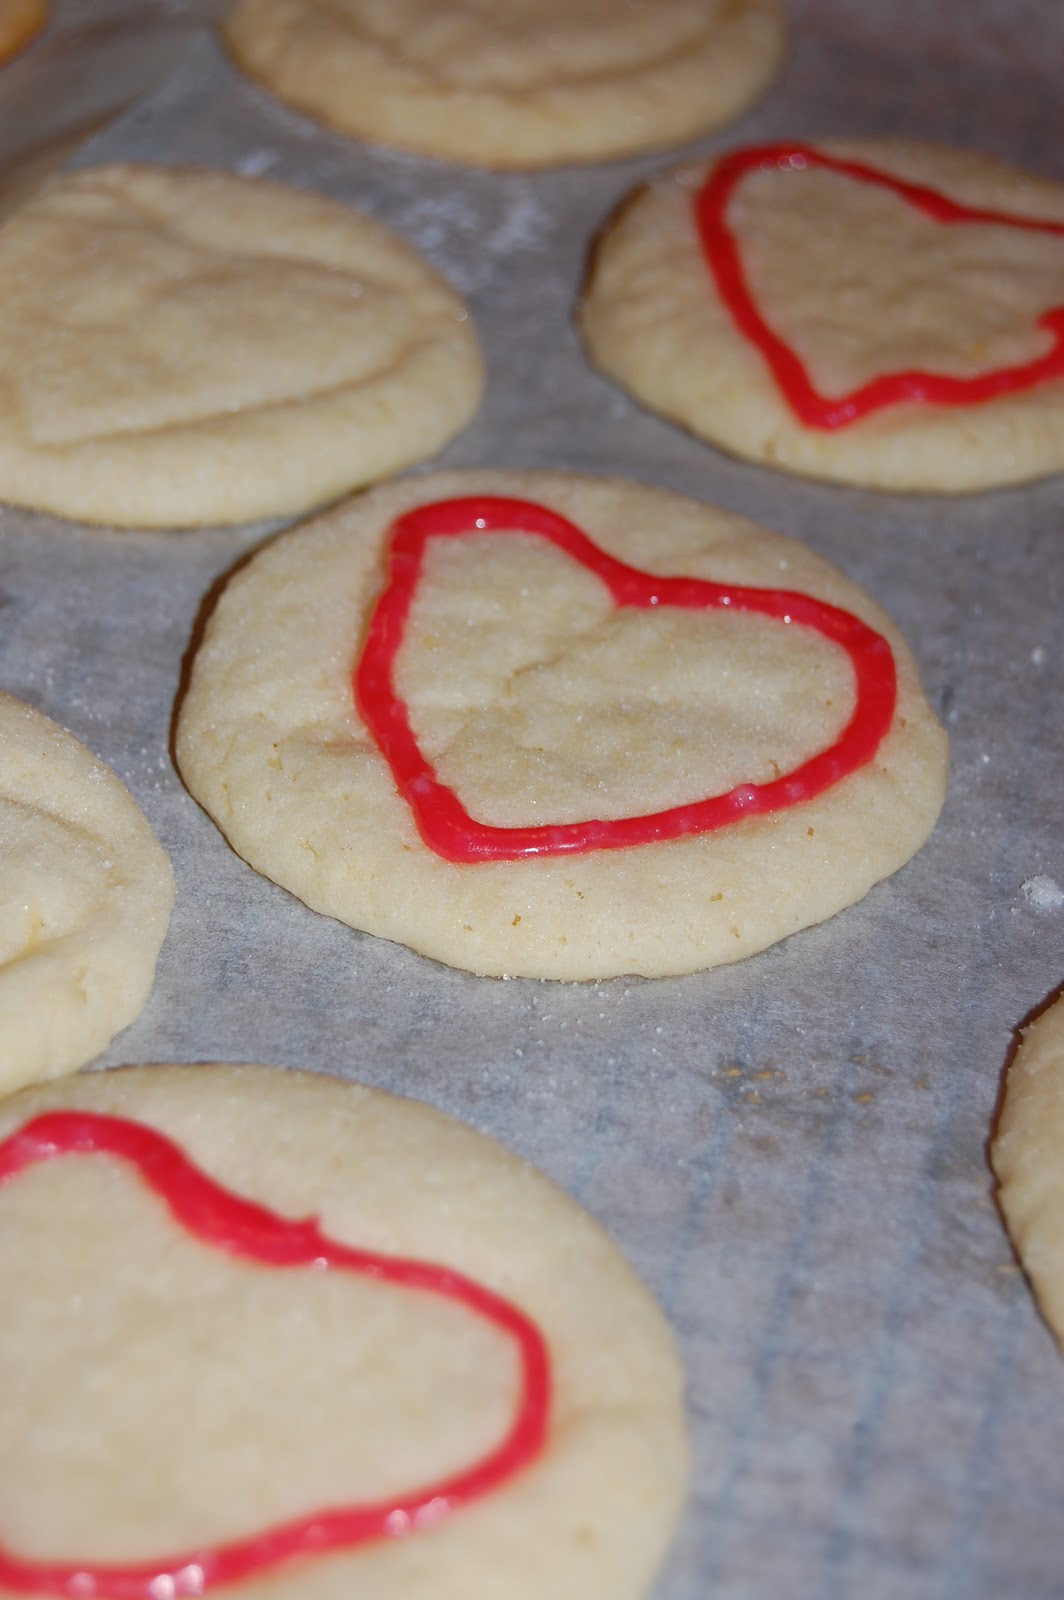
I then pressed a small (1.5"ish) heart cookie cutter into the dough, being careful not to cut all the way through. 
Don't they look all pretty and sugary?


In the spirit of "workin' with what I got," I used some canned (gasp!) frosting I had left over from some cupcakes I baked last week.  Since I didn't have very much, I only outlined the hearts, rather than filling them in.  Please note the missing cookie....one of my Trusty Taste Testers just couldn't wait...

Lemony Sugar Cookies

1 package Betty Crocker Sugar Cookie Mix (prepared as directed on package)
1 lemon, zested and juiced
1/2 cup sugar
Icing for decorating, if desired

Prepare sugar cookie mix as directed on the package, adding in the zest and juice of the lemon.  Drop by rounded tablespoons full onto parchment lined baking sheets.  Dip a glass with a smooth bottom into sugar (wet it first to help the sugar stick the first time) and then flatten the cookie to about 1/4" thick.  Press a small cookie cutter into the surface of teh cookie, being careful not to cut all the way through (though I don't think that would be that big a deal if you did). 
Make as directed.  Mine took about 9 minutes at 350 degrees F. 
Transfer to a wire rack to cool.  Decroate with icing of choice if desired. 

Yumanomanomanom....

Enjoy!

Wednesday, January 12, 2011

An angelic bonus recipe.


I was introduced to a recipe recently that can only be described as divine. 

Divine. 

Deee-viiiiiiine. 

Angel Lush Cake. 

Have you heard of it?  It's apparently a pretty popular recipe, which makes me wonder: "Where the h-e-double hockey sticks have I been?" 

After I was served a slice of this heavenly creation, I asked for the recipe and couldn't wait to get home and recreate it.  It's so simple and I think that contributes to it's divinity. Angel food cake topped and filled with a mixture of pineapple, vanilla pudding mix and Cool Whip and garnished with fresh raspberries.


Of course, I couldn't just go home and make it as originally described.  I had to make it MY way.  Rather than initially tamper with the ingredients (if it ain't broke, right?), I decided to alter the form.  Rather than choosing a traditional angel food cake pan i went with everybody's favorite:  cupcakes!
 

Unfortunately, fresh raspberries in northeastern Pennsylvania can set you back a small fortune this time of year, so I opted to leave them out.  I couldn't bring myself to spend the same amount on the garnish as I did for all the ingredients combined.   Plus, I already had all the other ingredients on hand.

Here's the scoop:

Angel Lush Cupcakes

1 package angel food cake mix (prepared according to package directions)
1 package (3 oz-ish) instant vanilla pudding mix
2 8-oz cans crushed pineapple in juice
1 cup Cool Whip
 
Preheat oven to 375 degrees F.
 
Prepare angel food cake according to package directions.  Fill 24 paper lined muffin cups about 2/3 of the way full.  Bake for 12-15 minutes or until the top is golden and appears dry.  Cool for about 10 minutes before transferring to a wire rack.
 
Meanwhile, prepare the topping.  Mix together the pineapple and pudding mix.  Fold in Cool Whip until well combined.  Frost the cupcakes with the mixture (if you don't eat the entire bowl first).  Garnish with fresh raspberries (if you're not too cheap). 
 
Some notes:
 
1.  Keep these puppies in the fridge.  Not only for the topping, but to keep the cake from drying out. 
 
2.  These really are better the next day.  At first, I was quite disappointed with how the cake stuck to the cupcake wrappers.  I vowed the next time I make them I'd use foil wrappers or no wrappers at all.  When I noshed on one the next day, the wrapper slipped off the cool cupcake easily - no problemo!  I was also impressed by how the pineapple flavor was even more pronounce and seemed to almost seep into the nooks and crannies of the cake...


3.  Some changes I've been toying with:  using pineapple juice in place of the water (or some of the water) in the cake mix, adding a raspberry filling, adding Chambord to the cake.  Maybe I'll try these ideas.  Maybe not.  These cakes are really so good the way they are, I don't want to mess with greatness, kwim?

4.  One word:  trifle.  I definitely plan on this one this summer.  Picture it:  layers of angel food cake, the luscious topping, raspberries and Cool Whip.  I'm excited.  (squee!)
ENJOY!


Monday, January 10, 2011

When hoarding can be a GOOD thing - Cookie #93: PB&J Bars

In a past life I was a coupon-er.  I loved the thrill of clipping dozens of coupons from two different Sunday papers and matching them up with local grocery ads.  It was such a rush watching the total on my bill drop as the cashier scanned coupon after coupon after coupon.  Even the impatient stares of the customers behind me in line couldn't take away the euphoric feeling of saving almost 75%.

This brings me to the story of the peanut butter.  Peanut butter went on sale.  There was a coupon.  A really good coupon.  Actually several really good coupons which I hoarded in my pink coupon pouch.  I think I ended up getting the peanut butter for around 25 cents a jar. 

The problem?  I ended up with SEVEN jars of peanut butter.  At the time it was just my husband, myself and a non-peanut butter eating newborn in our home.  What on EARTH could we do with seven jars of peanut butter?  I immediately started trying out recipes. 

Peanut butter cake. 
Peanut butter frosting. 
Peanut butter fudge. 
Peanut sauce for chicken satay. 
Peanut butter cookies. 

I remembered having this awesome peanut butter bar cookie at a craft fair earlier that year and I decided I'd try to recreate it.  The cookie itself was vegan, but since at the time I knew little of vegan cooking, I chose to make them the "regular" way  (regular to me that is).  The bar cookie I remember consisted of this creamy peanut butter base.  The sweetness stuck to the roof of your mouth.  It was topped with a strawberry jam - and a good, homemade strawberry jam, at that. I could taste the chunks of fruit.  The whole thing was topped with an oatmeal crumble that was divine. 

So, armed with my seven jars of peanut butter, I got to baking. 

I was quite pleased with the results.  I opted to use plain old Welch's grape jelly instead of making my own strawberry jam.  Partly because I love grape jelly with peanut butter (currant jelly, too!) but, mostly because I was too lazy.  I had a newborn, remember?

So, here they are in all they're glory - rich, peanut buttery and oh so delicious. 
Enjoy!

Peanut Butter & Jelly Bars


1 1/2 cups flour
1 teaspoon baking powder
1/2 teaspoon salt
1 1/2 cups oats
1 cup brown sugar
1/2 cup unsalted butter, cut up into chunks
1/2 cup peanut butter
3/4 - 1 cup grape jelly (or your jelly of choice)
1/4 cup chopped, roasted/salted peanuts

Combine all ingredients, except jelly, in a large bowl until well incorporated.
Press half the mixture into a buttered 13x9" pan.
Spread jelly over the top until even.
Sprinkle with remaining dough mixture & chopped peanuts.
Bake at 350F for 30-40 minutes or until golden.
Let cool before slicing into bars.


PS - I have a picture of these scrumptious treats but realized it's saved on my office computer - not my laptop.  I'll update with a yummy photo tomorrow.

Monday, January 3, 2011

Do blondes really have more fun? - Cookie #92

I've lived my life as a brunette.  The closest I've ever come to blond was when I had highlights done about 5 years ago.  After seeing pictures of myself, I realized blond was NOT for me.  I quickly went back to my "natural" brown. 
I don't really think blondies classify as a cookie.  Snickerdoodles do, though.  Enter:  Snickerdoodle Blondies.
Part cookie.
Part blondie.
All awesome.

These are by far the BEST blondies I've ever eaten.  They get this most fabulous crunchy coating on the top from the cinnamon sugar.  The middle is soft and squishy.  I could seriously sit down and eat an entire pan if it wouldn't make me deathly ill. 

I adapted this recipe from several I've found in my travels.  I hope you enjoy.


Snickerdoodle Blondies

1 cup butter, softened
1 cup white sugar
1 cup packed light brown sugar
1 teaspoon cinnamon
1 teaspoon salt
2 teaspoons baking powder
2 cups flour
2 eggs
2 teaspoons vanilla extract
2 tablespoons granulated sugar
2 teaspoons cinnamon

Preheat oven to 350 degrees F.
Cream butter and sugars together until creamy.  Add eggs and vanilla until well combined.
Sift flour, cinnamon, salt and baking powder in a separate bowl.
Gradually add flour mixture to butter/egg mixture and mix until just combined.
Spread batter into a lightly greased 13x9" pan.
Combine 2 tablespoons sugar with 2 teaspoons cinnamon.  Sprinkle mixture evenly over batter.
Bake for 25-30 minutes until edges are lightly brown and blondies are set.
Cool completely in the pan before slicing into bars.


Tuesday, December 28, 2010

Where I've been (and a recipe, too!)

When I began this blog, I fully expected to make it the full 365 days. 
I imagined my notebook full of 365 cookie recipes. 
I imagined people everywhere trying my recipes for their families and sharing them with friends.
My back, however, had other plans.
The day after I posted my last cookie, I became incapacitated.
You see, I have this nasty thing called Psoriatic Arthritis.  It's similar to rheumatoid arthritis in that my immune system is attacking my joints.  My PsA attacks my spine, hands, knees and shoulders.
The morning after I posted the raisin biscuits, I couldn't move.  Usually, the pain and stiffness lessens as the day goes on. 
This time it didn't.
I couldn't stand.  I couldn't sit.  I couldn't bend.  I couldn't walk.
The only comfort I could find was lying on my living room floor with my legs propped up on my coffee table and a heating pad or ice pack on my back.  Certainly not a position conducive to cookie baking.
Much to my dismay, I knew I needed to abandon the cookie 365 experiment - at least for a while.  I was ashamed, which is why I disappeared into the blogosphere.
I'm sorry.
I've received several e-mails from readers inquiring about my whereabouts. 
I assure you - I'm here and I fully intend on sharing more delicious cookies with you!
Enough about my woes...let's give the people what they want:  COOKIES!

I came upon this recipe while browsing a lovely little blog named The Picky Palate.

I was mesmerized by the thought of it.  BROWNIE COVERED OREOS.

Seriously?

How on Earth could you make milk's favorite cookie any better?

You dip it in brownie batter and bake them.

It was roughly 9:30pm when I came across the recipe and by 9:45 I had the first batch in the oven. 

Holy schmoly.  These suckers are sinful.  Just look at the little devils:


Told you.


Stop it.  Just stop it.

Here's how I made this little devils...

Ingredients:

1 box brownie mix of choice, prepared according to package directions
1 box Oreos
Cooking spray
White chocolate
Sprinkles, crushed candy canes, etc. to decorate the tops

Preheat oven to 350 degrees F.
Generously spray 2 muffin tins with cooking spray. 
Dip each Oreo into the brownie batter until well coated.  Place one Oreo in the bottom of each muffin cup.
Bake for 12-15 minutes until the brownies are done.
Immediately upon removing them from the oven, run a thin bladed knife around each brownie.  This will ensure the brownies don't stick.
Cool for about 5 minutes or so before removing from the muffin tins.
Decorate with melted white chocolate and your decorations of choice.
I decorated mine with some crushed candy canes, red sprinkles (or jimmies) and some sugar crystals.

The possibilities are endless with these! I can't wait to try them with mint Oreos and peanut butter Oreos!  Yum!

Enjoy and I promise - I'll see you real soon....

Thursday, September 30, 2010

Cookie #90 - Raisin Biscuits

Number 90.  Woot, woot!  I'm about 25% of the way there. 

These cookies were inspired by a cookie I used to eat at my best childhood friend's house growing up.  Michelle's mom always had these Golden Fruit biscuits on hand.  They weren't super sweet.  Just a soft, flaky biscuit with sweet, chewy raisins in the middle. 
Years later, my mom found a similar cookie in a catalog and ordered some for me.  They were indeed delicious, but like I've mentioned before, often times the memory is greater than the taste. 
These cookies were delicious.  Very scone or tea-biscuit like. 
They were very much loved by my trusty taste tester #2 (my mom) and my mother-in-law (who was visiting this week). 
These cookies are also super easy to make and I can see making them over and over again.  Yum!

A few notes about the recipe:

1. Next time I'd chop the raisins a bit before adding them.  The raisins were a bit big and I think needed to be pared down a bit.  The inspiration biscuits had more of a chopped raisin filling - I don't know why I didn't stick with that. 

2. While I like the technique I used for these (based on a currant cookie I've made before), I think next time I'll do more of a biscuit with a top and bottom crust.  I think it'll work rolling out the one portion of the dough into a large rectangle, cover the raisins and then covering with the other rolled out portion. 

3. Though the recipe I list below states milk, I used heavy cream.  Totally not necessary, but I had it on hand and wanted to use it before it spoiled.

4. The turbinado sugar.  Please don't use regular granulated white sugar.  I know often times you can get away with using just regular granulated sugar for sprinkling on top, but in this case the coarse sugar really adds a nice crunch to a really soft and chewy biscuit.  Regular granulated sugar, while adding the necessary sweetness, would just be lost. 

Raisin Biscuits

1 cup flour
2 tbsp confectioner's sugar
1 tsp baking powder
1/4 tsp salt
1 tsp vanilla
1/2 cup unsalted butter, cut in to cubes and cold
2 tbsp milk
1 egg, beaten with 2 tsp cold water
1 cup raisins
2 tbsp turbinado sugar (Sugar in the Raw)

In the bowl of a food processor, combine flour, confectioner's sugar, baking powder and salt.  Pulse a few times to combine.  Add butter and pulse until crumbly and the texture of coarse sand. 
Add vanilla and milk and pulse until the mixture forms a ball.
Divide dough in half, wrap with plastic wrap and chill for at least 2 hours.
Preheat oven to 350 degrees F.
On a well floured work surface, roll one portion of dough into a rectangle about 12" long and 1/8" thick.  Brush surface of dough with egg wash and sprinkle half the dough evenly with half of the raisins.  Fold the dough onto itself, sandwiching the raisins inside.  Lightly roll the dough again until about 6" wide and 12" long.  Fold the dough in half lengthwise again and transfer the entire piece to a parchment lined cookie sheet. 
Brush with egg wash and sprinkle with 1 tbsp turbinado sugar.  Cut the length of biscuits into 2-3" pieces using a pizza cutter (no need to separate them at this point, just cut them). 
Repeat the process with the other portion of the dough.
Bake for 15-18 minutes until golden brown. 

Wednesday, September 29, 2010

Cookie #89 - Mini Jam Pie Cookies

In pastry, there are four classic doughs that are used:

Pate Brisee, traditional pie dough.

Pate Sablee, a crumbly dough commonly used in tarts.

Pate a choux, which is a light airy dough used for cream puffs, eclairs, etc. 

Pate sucree, a sweet pastry dough. 

These cookies use pate sucree.  If you've never made a pie dough, or are intimidated by it, this is a fantastic way to start.  I find a pate sucree much easier to work than a traditional pie crust.  Maybe it's the addition of the sugar and the egg yolks.  Maybe it's the fact that when I make a pate sucree I tend to be a little less stressed than when I make a pie crust.  Coming from a long line of pie-making women, I've got a lot to live up to.  That puts a lot of stress on a girl. 

The inspiration for these cookies came after I spent a weekend testing some apple pie recipes for an upcoming contest at my local farmer's market.  I had a little pie crust left over and decided to bake off some little mini turnover like bits.  I filled them with some strawberry preserves I had on hand. 

I was disappointed.

I knew there had to be a better way.  After realizing that the dough itself wasn't sweet enough for this application, I chose to use the pate sucree.  Have I mentioned how much I love this dough?  Now I had to decide the filling.  As I reached for my jar of store-brand raspberry preserves, I remembered I had a jar of the most awesome berry preserves in my pantry. 

Dutch Hill Preserves is a vendor at my local farmers' market.  95% of the fruit they use is local (75% they grow themselves).  The other 5% is citrus and we all know you can't grow good citrus in Pennsylvania.  I've hand quite a few of their jams & jellies, but their Triple Berry Jam is by far my favorite. There is no denying this is a real berry jam.  As you spoon out the jam you will find whole strawberries, blueberries and blackberries. 


I've never had jam so good.  It is better than anything you can ever buy off the shelf at your grocery store.   You can taste the freshness of the berries - they taste like the breezy Pocono mountains and the warm summer sun.  Perfect to compliment my sweet pastry. 

After baking off a batch, I couldn't wait to dig in.  I had to execute some serious willpower - but hot jam burns and I wanted to really be able to enjoy these.  The pastry was sweet and tender and the jam oozed just a little on first bite.  The sweet and tart berries tingled my tongue.  The raw sugar sprinkled on top added a little bit of a crunchy texture - I love that. 

Don't they just look delicious? (ignore the one in the center on the bottom....I got a little over zealous with the jam).


I am so excited with the way these cookies came out. I have a few set aside and I can't wait to share them this weekend with the folks at Dutch Hill Preserves. I hope they agree that my pastry showcases their delicious jam just perfectly.


Now, onto the recipe:

Mini Jam Pie Cookies

2 1/2 cups all purpose flour
2 tablespoons granulated sugar
1 cup unsalted butter, cold and cut into cubes
2 egg yolks
1/4 cup ice water
1 cup preserves of your choosing
1 egg beaten with 1 tsp cold water
a few tablespoons turbinado sugar (aka, Sugar in the Raw)

In the bowl of a food processor, add flour and sugar.  Pulse a few times to combine.  Add cold butter and pulse until crumbly and the texture of sand.  Add egg yolks and pulse to combine.  With the processor running, drizzle in the water until the mixture forms a ball.  Wrap the ball in plastic and refrigerate for at least 2 hours or overnight. 
Preheat oven to 375 degrees F.
On a well floured work surface, roll out portions of the dough until very thin - less than 1/4".  Cut the dough using a 3" round cookie cutter.  In the center of each circle, place about 1/2 - 1 tsp of jam.  Don't over fill or this will happen:


Wet the edges of the circle with water and fold over.  Press closed with your fingers and the crimp the edges using a fork.  Place on a parchment lined baking sheet about 1" apart (they don't spread or puff too much so you can place them pretty close together). 
Brush with beaten egg and sprinkle with turbinado sugar.
Bake for 12-15 minutes or until golden colored.